If you would like to write me more in private, please send me a line at OneStitchNirvana@gmail.com

Wednesday, March 16, 2011

Spring is Sticking Up!

Hi Everyone!  I hope that you are starting to see spring all around you right about now.  We are getting closer pretty quickly - you can almost hear the growing, if you listen carefully.  It is really exciting to see what is going on in the dirt. 
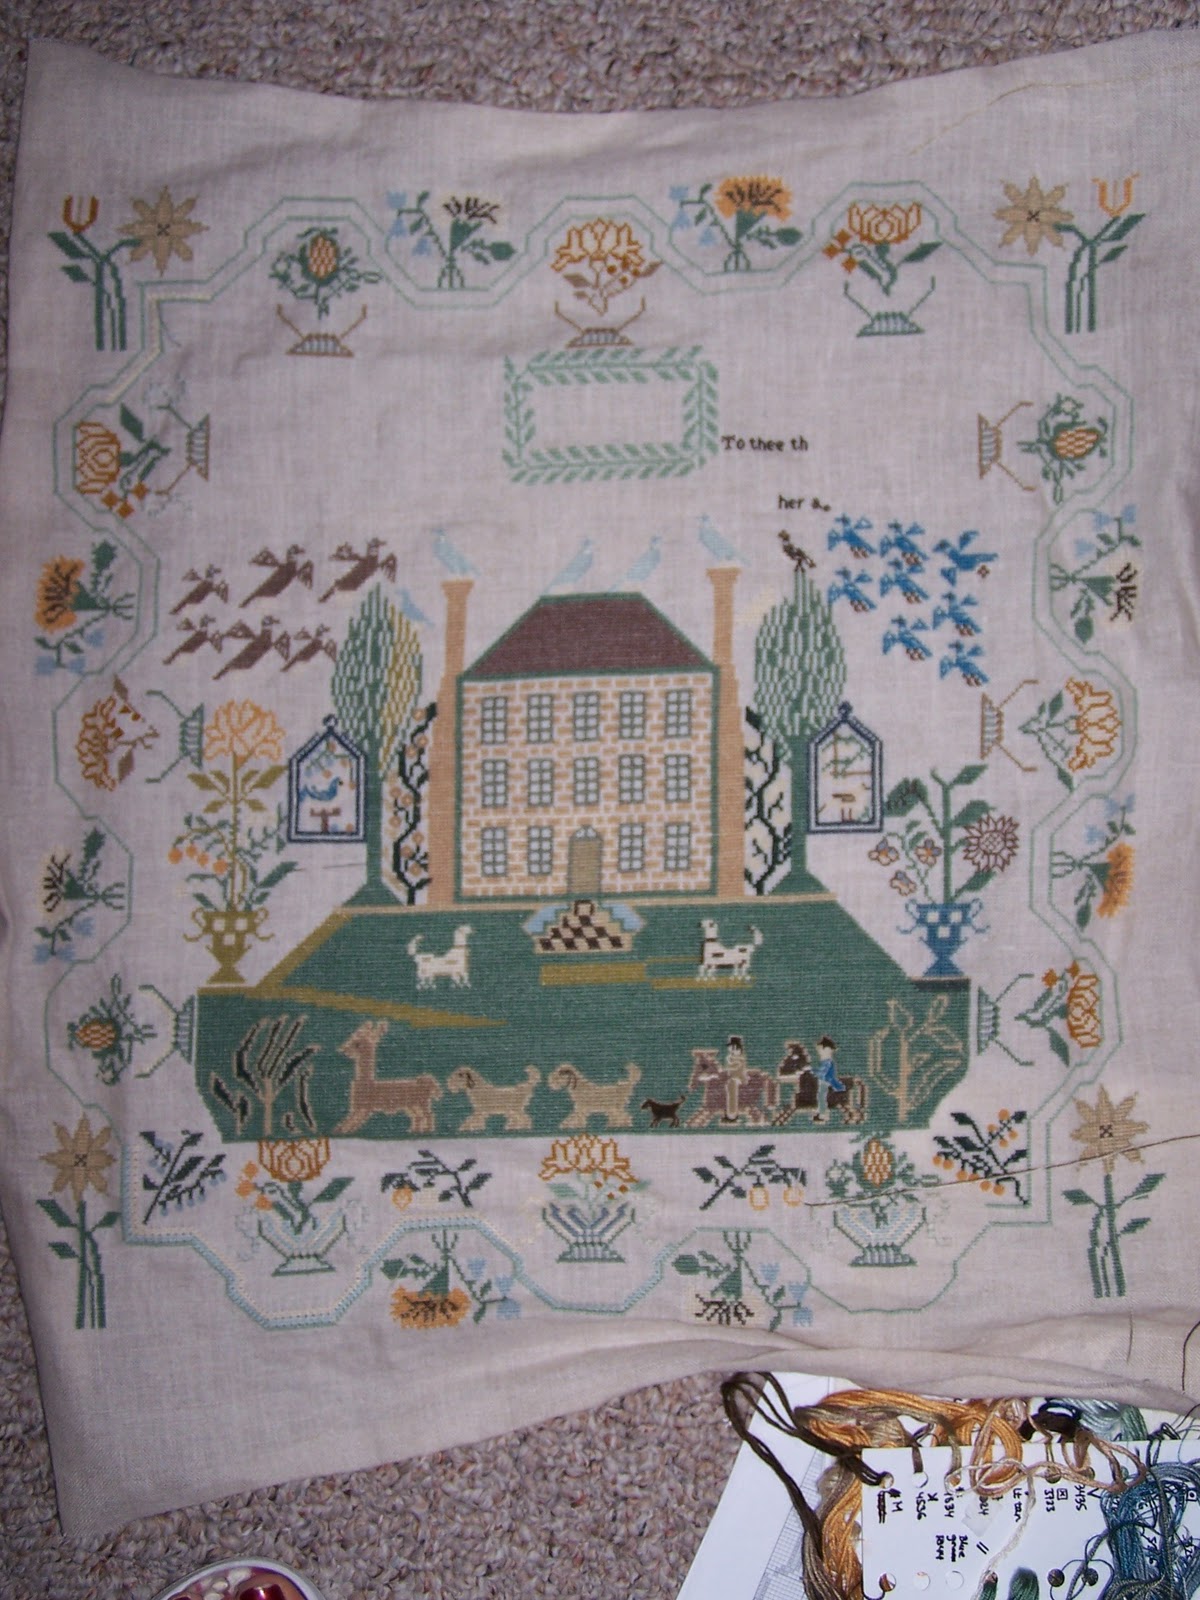
Before I show you Mother Nature's progress, I'd better show you some of my  stitching updates...  Look - I am not a total slacker!  The Richmond sampler is moving forward .  I have finished the dreaded riders and even filled in the entire lawn.  Now I need to concentrate on the two over-one sunflowers, the over-one verse and after that the Queen stitch border and she will be done!  I still love her, so that is a definite plus!

I did also start on the birth sampler for the brand new nephew, who arrived late last week.  He is a giant I've heard, wheiging in at over 11 lbs!  Phew!  I am having fun with the PS sampler that I picked and decided to switch out all the pink flowers for yellows and blues.  The baby is a Swedish boy, after all!

I did also manage to slap together the scissors-case/needle-book for my Little Sister over the weekend.  I am pretty please with how it turned out and I am hoping that LS will like it.  After I had finished up this, I felt like I needed to take a week-long break from any and all crafting...   About 2 hrs later, I bounced right back.
                                                                So, here is the front:
The back:
Inside (note Sweden in the cover and the tiny globe fob):
... and a close-up of the pin-disc part:
And finally, here are the pictures from my garden that I wanted to share with you. 
Spring is such a joy!
Happy Spring Time, stay dry, and talk with you in a bit!

Tuesday, March 15, 2011

Jewelery Organizer Board Tutorial

Hello there!  Hope that you had a great weekend.  I learned something new; there actually is a point at which I feel totally crafted out.  I did not want to take one single stitch more.  I did not want to fantasize about new projects.  I did not want to fondle fabrics.  I did not care to flip through any craft magazines.  Luckily, I am almost back to normal today....  :-)
So, as you may recall, I am leaving for a trip back home to Sweden very soon.  I am trying to get all my craft projects in one row before the plane takes off.  I have a list of things that I need to work on:
i)  A scissors case/needle book for my Little Sister
ii)  A picture for my Littlest sister
iii)  A birth sampler - the new baby arrived last week!  My brand new nephew, Edvard, is a giant, weighing in at over 11 lbs at birth... 
iv)  Fun stuff in general...

So, I started with the last item and decided to make some quick jewelery organizer boards for my sisters.  (I'll post more about the other projects tomorrow.  Maybe...)  I made one for myself not too long ago and figured that the sisters may like to have one each as well.  As you can see from the photo below, mine gets used plenty!  
I decided to try my hand at a tutorial, since I love to browse the net for those and I enjoy reading them a lot...
 Let's get started:
1)  Gather up all your materials.
  • You need a couple of fabrics that look good together.  Size will depend on how large you make your board.
  • A frame easel (got mine at Hobby Lobby for less than $5)
  • Warm and Natural batting or something similar
  • 6 Beads or Buttons
  • General tools; paper scissors, fabric scissors, X-Acto knife, sewing needle and strong sewing thread, thin permanent marker, pencil, heavy cardboard (I use mat board), foam board, glue, hot-glue gun
 
2)  Draw up your board shape on the heavy card board.  This will be your board back.  I use one of my dessert plates as the template.  It is square with rounded corners - the rounded corners makes this project so much easier!!!
3)  Draw up the same shape on the mat board.  Cut out this part with the X-Acto knife about 1/2 inch in from the shape and lay on top of the heavy cardboard to check the fit.  The larger mat-board cut out should form a shape around the foam board.

4)  Cut out two layers of batting the same size as your board.  You can adhere them lightly to the board using glue stick or similar.  The glue is just to help keeping the batting in place during assembly, so use a very small amount!

5)  I like the board to be of a "mattress type", so I add a few beads on the front.  Prep your board by drawing two vertical lines equidistant from the center of the foam board.  Mark three locations on each line, center, towards the top and towards the bottom - this is where you will add your beads, after you have "dressed" your foam board.  Use a large, thicker sewing needle to pierce a hole in each marked location of your board. 

6)  Cut out the main fabric about 1 inch around the foam board.  If you have a pattern with a directionality to it, be sure to mark the pattern direction on the foam board to ensure that your pattern won't end up sideways or upside-down. 
 
7)  Make a gathering seam by using your strong thread to sew a running stitch all the way around the fabric edge.  Be sure to leave two long ends.  Place your foam board, batting down on top of the fabric back - check fabric pattern direction - and pull your long thread ends.  Voila!!!  Just like magic!
 
8)  Add the beads with the strong sewing thread.  Simply pull thread through hole 1, pick up bead, down same hole, up next hole and continue until complete.  Tie off thread ends - be sure to pull enough to create the small dents in the fabric/batting for the "mattress" effect.  The front is finished!
9)  Do the same with the back - the mat board.  Keep in mind that the side with the gathered fabric will actually be your front, so be fairly generous with the fabric allowance so that gathering thread or edge won't show.
 
10)  Use the hot glue gun to fix front and back together.  Gathering-side to gathering side, so that back is as nice as front.  If your place is like mine, you won't have any place to do this but the stove top...
11)  You know what - you are finished - slam on holder and pin jewelery in place!  (Pardon the really fuzzy pic - I guess that I just ran out of gas right about here...)  
The yellow fabric is designed by Tula Pink, by the way.  It makes me really happy!  Bright yellow and orange with a bunch of keys hanging off trees and flowers.  Wonderful!
This is such a quick, cheap, and simple project, so it would be a lot of fun to do with the younger girls in your life (or for yourself, just because)!  The possibilities are endless; different shapes, one to hang on the wall, a narrow long one to use for brooch display only, one with a cross-stitched border or a monogram - you name it!
Please let me know if anything is unclear, or if something needs explained more in detail/doesn't make sense.  I also know that many of you could have figured this one out all by yourself, so I hope that I didn't bore you to death...  ;-)
Anyway, I hope that you will try to make one or a couple of these. Let me know if you do, so I get to admire your ideas.
Have fun and talk with you soon!  
Good night,

Tuesday, March 8, 2011

A Couple of Quickies

Hi there!  I am writing a quick update before hitting the road to work!
My cheating this weekend paid off!  I did finish up The Dragon of Hope for my LLS and I like the result.  The chart comes with two options for the globe, so I thought that one of them can be used as a really cute fob, so that is the plan as of today.  ;-)  
Since I am pretty bad at posting progress pics, you get both one of those and the finished stitch.  As you can see, I started with the easier part and saved the confetti stitching for last.  I would say that this is a very quick stitch either way.  It was also almost fun to back-stitch.  I haven't had to do that for ages!


And here below is the finished DT Pumpkin pocket.  The finishing was pretty easy and I would almost say clever.  Oh, and see that pretty polka-dot pumpkin colored lining fabric below?  Well, it is reversible and is a Gingham on the other side.  Too cute!  I made sure that I cut it very carefully, so now I have a snippet left to use for something fun!  I am thinking that I may try to make a tiny pumpkin pin-cushion, kinda' like a tomato pin-cushion, but with pumpkin colored fabric.  
I opted to go with a silk ribbon instead of a Hedebo-ring, because the finished purse does not really want to close.....  I am not real pleased with the thickness of the ribbon - I think that it needs to be several times thicker, both for looks and for practical reasons.  If I find something in the future, I'll probably "update" this piece.
So, if I were to sum up; fun stitch, easy finishing, great material, and a pretty cute result!  (I have no idea what to use it for, though...  ;-))

Well, that's it for now.  Have a great Tuesday and talk with you in a bit!  Happy Stitching!!!!

Saturday, March 5, 2011

Stitching Accessories

I am going to "cheat" again this weekend!  I have a perfectly good reason, I assure you (and myself....).  (And I have one of the riders + his horse complete.  The other one is half-way done....)

I have given a few people in my life small stitch sets, either because they like stitching or sewing or because they are related to me.
I made this small Assisi tin for my mom a few years back:
As you can see, it has magnets in the lid for needles and pins and I puzzled together her monogram in the cushioned bottom.

I also made the Littlest Little Sister a needle and scissors book with a seahorse a few years later.  Here I had even more fun designing a layout and picking lining fabric and ribbons.  It is made to hang from the back of a chair or a door-knob.  Note that Sweden is centered on the back of the heart as a symbol of me thinking of her.  The inside left hand panel centers the US, so that we can always be close.  (Sorry, I forgot to take a picture of the inside of the finished book, but you probably get the idea from the finished panels in the photo below.)  The motifs were taken from a French book with all kinds of gorgeous hearts charted, I think that DMC is the publisher.
 

I made this one for The Barbarian at work a couple of years back:
I had equally fun running amok with finishing ideas for this one too.  The center on the front with her first name initial a free-standing pin-disc.  The back is patriotic and forms a simple pocket where she can tuck in scissors, needle books and anything that she needs to have handy.

As you can see, I have truly enjoy making these little gifts for people I love.  I have a long list of additional friends to stitch for, but most important is my Little Little Sister.  She asked for either a dragon or dinosaur design a while back and I thought that it was impossible to find.  Until - duh! - it struck me a couple of weeks ago that I need to stitch her "The Dragon of Hope" which is a sweet freebie from Dragon Dreams.  This purple dragon even holds the Earth in its front claws - how perfect is that!?  I am very excited!  I know that it will be a quick stitch and I have already picked out the linen to stitch on.  Hopefully, I'll be able to stitch it up before next week is over.
If you missed the Dragon Dreams freebies, here is a link to the chart: Dragon of Hope 2005 and a list of other goodies here, under Dragons.  Here is a link to a completed dragon - isn't she pretty?

So why the hurry to finish the Dragon of Hope?  Well, I received some sad news from my mother two weekends ago.  My grandmother passed away.  It is hard to be so far away from family when these life-altering events occur.  There is no way to hold anyone, no way to just sit in silence and think together, so much harder to be there for support and sympathy.  Distance sucks sometimes!  I told my boss point blank that I will go to Sweden for the funeral.  He, in turn, discussed "the rules" with his boss (that is what I suspect at least) and came back to tell me that I got all the days needed to get home and back with pay and without counting towards my vacation.  It didn't matter, I had already booked the tickets, so I would have gone either way.  I am leaving DH here in the States.  I will miss him, but sometimes it is good to go alone.  My family and I are then free to speak Swedish and do things that are not that entertaining to him - like sitting in coffee shops and talking for hours, shopping for clothes, taking strolls, reconnecting on a personal plane, watch TV or movies...
It will be good to see the family.  I wish that the reason would be a happier one, but I just need to be there.

Have a great Saturday Evening and talk more soon - I have to report on what Hip Hip Happy and I did this morning!

Friday, March 4, 2011

TUSAL Update

A quick TUSAL pic before bed:
All that orange floss on top is from the DT Pumpkin Pocket.  The pink in the bottom is from the little spring set standing next to the TUSAL jar.
I did not generate as much floss as I had expected, but the Richmond sampler is such a slow stitch, so that is my excuse this time around...

Good Night, Sleep Tight and all that Good Stuff!

Thursday, March 3, 2011

Spring is Coming - Everything is Growing!

So, it was raining like crazy here last weekend and it doesn't look a whole lot better for the upcoming one.  That is all right with me - we usually get into a drough sitiation here before half the summer is gone, so the more "cats and dogs" in spring, the better I'd say!  
I was pretty bad at stitching this past weekend as I ended up with a pretty fabulous tear duct infection in my right eye on Sunday.  It is still healing and now it just looks bad, but I don't really feel it anymore.  No wonder I was cranky on Friday!  ;-)  Anyway, when I finally started to stitch, I got about one half of one of the Richmond horse riders done before I jumped into something completely different - the Pumpkin Pocket kit by Drawn Thread.  I love it!  It is the first time I have worked with Valdani over-dyed floss.  It is beautiful and feels so soft.  I also really like the lining fabric that comes with the kit; a really pretty polka-dot on a soft orange background.  This baby will get finished up this weekend! 
 

My garden is running amok right now.  The rain and the warmer days makes all the spring bulbs grow so that it almost is a visible difference from morning to evening.  I am thrilled - I sat all of these bulbs in October last year, so I can't wait to see what'll happen...  I am also "lucky" enough to have a memory like a gold-fish, so I am extra excited a to discover what I planted... :-)  I do recall spending days on getting all of them down in the ground.  
I think that it does look like some Hyacinths here below, but we'll have to wait and see. 
Here is visual proof that I may have bought more bulbs than I probably have space for.  (At least I am hoping that these were planted by me.)  I do recall that I bought a lot of bulbs that are supposedly early, middle and late spring bloomers, but it seems to me that they are all coming up at the same time.   

I have some fun stuff going on in my indoor pots too.  This plant is a Hoya Carnosa that has been taken from a parent plant that I have.  The parent plant never bloomed, but if you look closely, you can see 3 or maybe even 4 flower clusters.  I think that maybe this plant is sitting at a better location.  Plus my parrots have not tortured the will to bloom out of this one.  Yet.  Anyway, these white flowers give off a lot of honey and the fragrance is wonderful.  I did not perceive the Hoya as an uncommon houseplant back in Sweden, but I have not really seen any here in the US.  Can they be found around here?.
It is an interesting plant in that it prefers to have the roots pretty cramped up, so it does not want to be repotted often.  After re-potted it usually refuses to grow and bloom until the pot has been packed with roots again.  The flowers sprout out from the same tiny "knots" on the vines season after season, so it is important not to damage or cut the "knots" off, or the future flowers in that location are lost.  I am so happy - this is the second time this plant is on its way to flower and there are so may more locations this time around.  I promise to post pics as soon as it starts to bloom!

And now to something completely different.  Here is something  that grew in my mail-box the other day.  This is the tomato pin-cushion from the newest Little house Needlework and Impie, Hattie & Bea collaboration.  I am holding it up so that you can see how huge it is!

Scrappy, below, is our tiny parrot model for today.  He (or she?) is showing off the needle-book that comes together with the tomato in the "Fresh from the From the Garden" set.  
About the garden set: I am very pleased with colors, craftsmanship and so on.  I can add this kit to my (unstitched) Traveling Stitcher and the Scissor Bed & Pin Pillow....
About our model: Scrappy is Henny's (model from last time) cage-mate.  He can say "Hi Scrappy" and "Come here" in a really high-pitched and squeaky voice.  He doesn't mind being held and kissed and he is pretty skinny, so he freezes easily.  One of his favorite hang-outs is on top of the microwave in the kitchen or under a blanket on DH's or my lap.  He will cozy up in a blanket cave like that for hours and his feet are all nice & toasty once he finally decides to come back out.  Henny, on the other hand, will run around under the blanket and nip at anything she can get her little beak arund.  Seriously annoying if you are trying to grab a quick nap!   Scrappy is a little sweetheart and never picks figts with the other birds.  He doesn't chew on stuff either, but he does like to help me stitch by nibbling on the linen.  Sometimes I give him a small cut of linen and he goes to town with that - chewing and pulling and nipping.  Heaven for a little piece of Scrap!

A pile of other stuff landed in the mail box too.  I ordered a bunch of stuff from three different stores at very different times, but all the packages arrive on the same day.  Since it was on Friday and I was in a dark hole that day, I didn't even have the energy to get excited, but let me tell you that I am getting there now!
The only problem is that it will be a challenge to be good and stick to the projects I need to finish before digging into all these goodies!

I ordered these French books from the fabulous on-line stitch store Violarium in Finland (product selection is great and shipping is very reasonable - check it out, if you haven't had a chance before!).  My favorite purchase is the book lying in the bottom - absolutely gorgeous projects and definitely a great motivation to learn French.  ;-)  DH and I had some fun trying to make out what the first couple of sentences mean.  They did not make sense at all...  :-b

And finally - this is a large part of the reason why I am excited about spring!  Shoes!!!!  I love shoes.  Almost all of them have very high heals and "character".  I got the pairs below from Off Broadway Shoes.  I am aware that the polka-dot and gingham shoes are *possibly* over the top, but I believe that I get away with wearing shoes like these by balancing the outfit with very strict and classic clothes (and balancing period, of course...).  Long black pants, shirts that cover shoulders and no deep cuts up front.  You have to admit that they are serious eye-candy, right!?  Love'em - can't wait to click-click-click around in them!!!  (My colleague The barbarian always says that she can "hear the clippeticlop of tiny Swedish hoofs" when I am marching down the corridors at work....)
I got these babies when P.Snickety and I went to the Off Broadway the day before her "BIG" B-day party (she says "BIG" - she turned 30.... sigh!).  She got a pair of cool pumps with zebra print and was adventurous enough to ask her husband for his opinion.  The judgment came in as "80's hooker".  No worries - she didn't care and wore them to the party.  She was very happy!
Luckily, my DH doesn't say much, since he assumes that he "just doesn't get it".  ;-) 
Well, enough aimless babble from me today.  Time to get myself into bed!
Take care and Happy Spring-Stitching to all!